
In this tutorial, we will build a small 2D platformer adventure game using Phaser 3, HTML, CSS, and JavaScript.
Here is the Game screen:
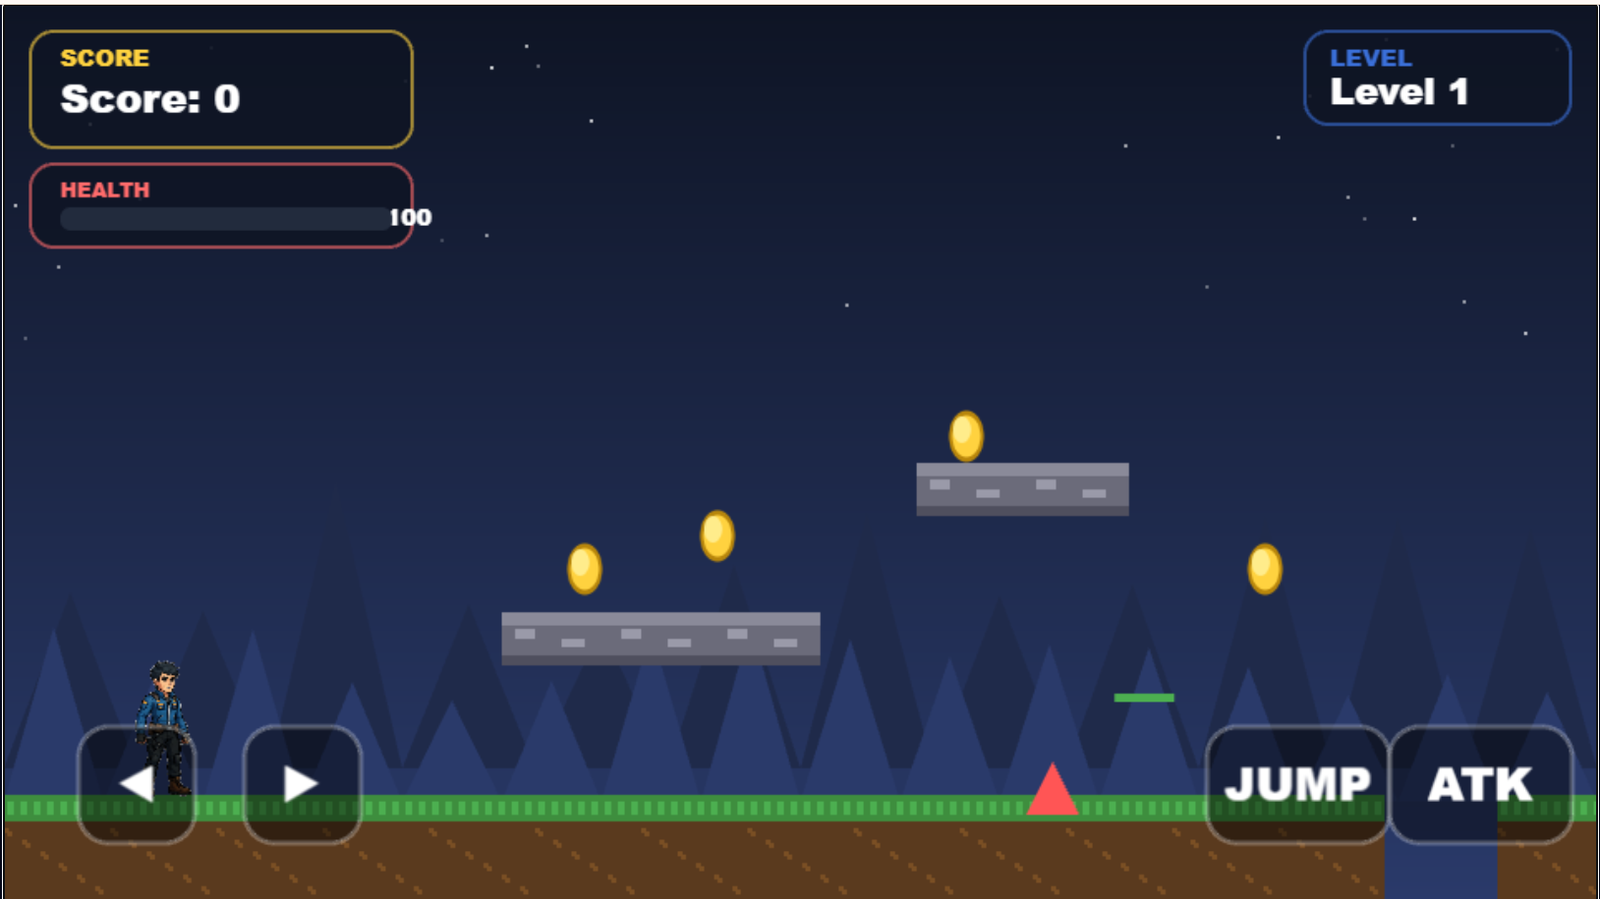
The game features a custom AI-generated character, keyboard controls, mouse controls, mobile touch controls, platforms, coins, enemies, health, attacks, multiple levels, a score system, a finish point, and Game Over and Level Complete screens.
What makes this project especially interesting is that AI tools helped create and debug the game. The character artwork was generated with AI, while Ollama and OpenCode were later used to generate, modify, debug, and organize the actual game files.
The final game runs directly in a web browser and can work on both desktop and mobile devices.
1. What We Are Going to Build
Before writing any code, let’s understand the final result.
Our game is a small side-scrolling platform adventure.
The player controls an adventurer who can:
- Move left
- Move right
- Jump
- Attack
- Collect coins
- Fight enemies
- Lose health
- Die
- Reach the finish point
- Complete multiple levels
The game also includes:
                 SCORE
              ┌─────────┐
              │ Score: 0 │
              └─────────┘

                         LEVEL 1


                         🪙
              ─────────────────
       🪙                    🪙

   PLAYER                         ENEMY
     🧍                         🔴

────────────────────────────────────────
                 GROUND

 [ ◀ ] [ ▶ ]                 [JUMP] [ATK]
The important part is that this is not just a static animation.
The character exists inside a game world with physics, movement, collision, enemies, collectibles and game states.
2. Why Phaser?
For this project, we use Phaser 3.
Phaser is a JavaScript framework designed specifically for browser-based 2D games.
It provides many things that would otherwise take a lot of programming:
- Game loop
- Sprites
- Sprite sheets
- Animations
- Keyboard input
- Mouse input
- Touch input
- Physics
- Cameras
- Scenes
- Tweens
- Particles
- Game scaling
This makes it a particularly good option when you already know JavaScript.
You don’t need Unity or Unreal Engine for a small browser-based 2D game like this.
3. What About Mobile Touch?
One of the requirements of our project was that the same game should work on desktop and mobile.
Therefore, we don’t want separate versions.
The game supports:
Desktop
A / ←       Move left

D / →       Move right

Space       Jump

J           Attack
It also has on-screen buttons that can be clicked with a mouse.
Mobile
[ ◀ ] [ ▶ ] [ JUMP ] [ ATK ]The important Phaser concept here is pointer input.
Phaser’s pointer events can work with:
- Mouse
- Touch
- Pen/stylus
So we can build one button system rather than completely separate mouse and touch systems.
4. Creating the Character with AI
The first major asset we need is our player character.
For this project, we created a young male adventurer wearing a blue jacket, dark pants and brown boots.
Instead of drawing the character manually, an AI image-generation tool can be used.
We asked the AI to create multiple poses of the same character.
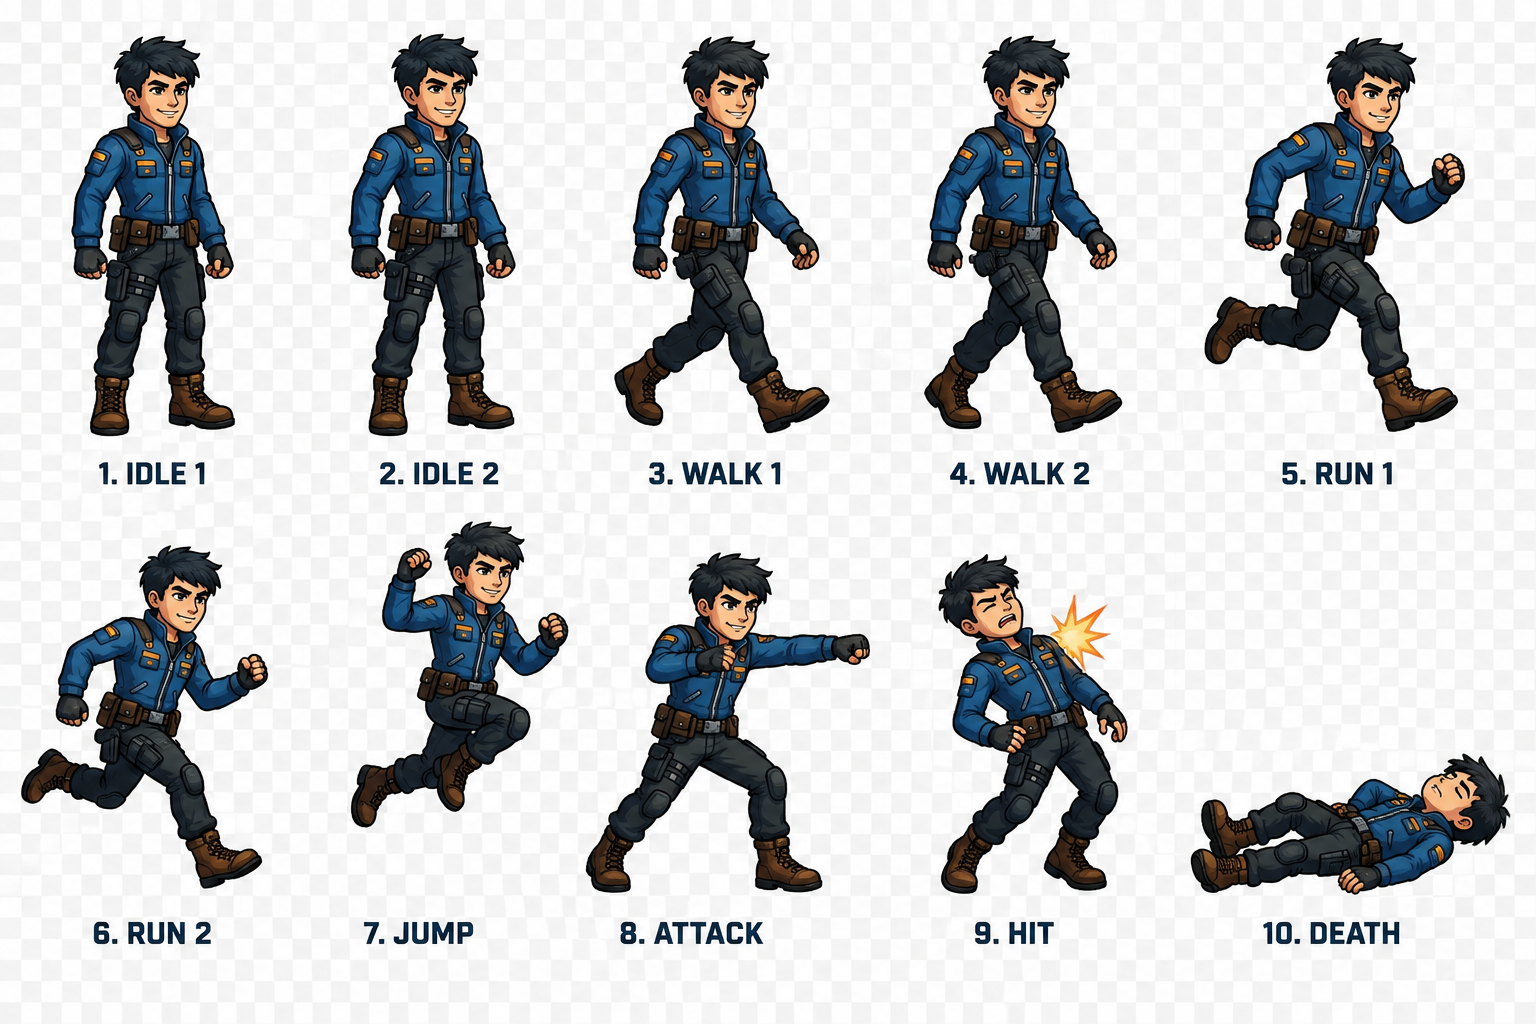
The desired poses were approximately:
- Idle
- Idle variation
- Walk
- Walk variation
- Run
- Run variation
- Jump
- Attack
- Hit
- Death
These poses are eventually used as animation frames.
5. Understanding a Sprite Sheet
A sprite sheet is simply one image containing multiple animation frames.
Instead of having:
idle.png
walk1.png
walk2.png
run1.png
run2.png
jump.png
attack.png
we can put the frames into one image:
┌────┬────┬────┬────┬────┐
│  0 │  1 │  2 │  3 │  4 │
├────┼────┼────┼────┼────┤
│  5 │  6 │  7 │  8 │  9 │
└────┴────┴────┴────┴────┘
Phaser can then automatically treat each section as an individual frame.
In our project, the logical animation mapping is:
0,1   → Idle
2,3   → Walk
4,5   → Run
6     → Jump
7     → Attack
8     → Hit
9     → Death
This is much easier to manage than manually loading ten different images.
6. An Important Problem with AI-Generated Sprite Sheets
This is something worth demonstrating in a video tutorial because it is a real-world AI development problem.
Our original AI-generated character sheet was not immediately ready for Phaser.
The image contained:
- Multiple characters
- Labels
- Background/checkerboard information
- Uneven usable character areas
The original uploaded character image was 1536 × 1024 pixels.
Therefore, we couldn’t simply tell Phaser:
frameWidth: 256,
frameHeight: 256
and expect everything to work perfectly.
We needed an additional processing step.
7. Processing the Character in Phaser
Rather than manually cutting ten PNG files, the project processes the original character sheet when the game starts.
This happens inside:
js/scenes/BootScene.jsThe game initially loads:
this.load.image('player-raw', 'assets/player.png');The original sheet is treated as:
5 columns
×
2 rows
Each source frame is:
307 × 512The bottom portion containing the labels is removed.
The code uses:
const LABEL_BOTTOM_PX = 75;Therefore:
512 - 75 = 437The processed frame becomes approximately:
307 × 437The code then creates a clean canvas, processes each frame and removes near-white pixels.
That allows the background to become transparent.
Finally, Phaser creates a new sprite sheet:
this.textures.addSpriteSheet('player', canvas, {
    frameWidth: dstFrameW,
    frameHeight: dstFrameH,
    endFrame: totalFrames - 1
});
This is a useful technique when AI-generated assets aren’t perfectly game-ready.
8. Project Structure
Our finished project uses this structure:
game/
│
├── index.html
│
├── css/
│   └── style.css
│
├── js/
│   ├── config.js
│   ├── main.js
│   ├── phaser.min.js
│   │
│   ├── entities/
│   │   ├── Player.js
│   │   └── Enemy.js
│   │
│   └── scenes/
│       ├── BootScene.js
│       ├── GameScene.js
│       └── UIScene.js
│
└── assets/
    └── player.png
This is a relatively simple structure.
We don’t need:
- Node.js
- React
- Vue
- A database
- A backend
Everything runs in the browser.
9. Creating the HTML File
The first file is:
index.htmlThis provides the basic webpage and loads Phaser and our JavaScript files.
The important part is:
<div id="game-container"></div>This is where Phaser creates its canvas.
We then load our files:
<script src="js/phaser.min.js"></script>

<script src="js/config.js"></script>
<script src="js/entities/Player.js"></script>
<script src="js/entities/Enemy.js"></script>
<script src="js/scenes/BootScene.js"></script>
<script src="js/scenes/GameScene.js"></script>
<script src="js/scenes/UIScene.js"></script>
<script src="js/main.js"></script>
The order matters because the later files depend on classes and variables created earlier.
10. Configuring Phaser
Next we create:
js/config.jsThis contains our game configuration.
The game uses:
width: 960,
height: 540
So our logical game resolution is:
960 × 540This gives us a 16:9 game area.
We use:
type: Phaser.WEBGLand Arcade Physics:
physics: {
    default: 'arcade',
    arcade: {
        gravity: { y: 1100 }
    }
}
The gravity value gives our character a natural falling effect.
11. Creating Player Settings
Instead of scattering numbers throughout the code, we create a configuration object:
const PLAYER_CONFIG = {
    walkSpeed: 180,
    runSpeed: 320,
    acceleration: 900,
    deceleration: 1200,
    jumpVelocity: -520,
    maxHealth: 100,
    attackDamage: 25,
    invulnMs: 800
};
This is useful because we can easily change the game’s feel later.
For example:
walkSpeed: 180can become:
walkSpeed: 250and the character will move faster.
12. Creating the Level Data
We don’t hard-code every platform directly into the game logic.
Instead, we create level configuration.
For example:
{
    name: 'Level 1',
    width: 3000,
    groundSegments: [
        { x: 0, w: 800 },
        { x: 900, w: 700 },
        { x: 1700, w: 500 },
        { x: 2300, w: 700 }
    ]
}
This means the level is:
3000 pixels widewhile the visible game screen is only:
960 pixels wideThe camera therefore moves through the level as the player progresses.
13. Adding Platforms
We also define floating platforms:
platforms: [
    { x: 300, y: LEVEL_HEIGHT - 174, w: 192 },
    { x: 550, y: LEVEL_HEIGHT - 264, w: 128 },
    { x: 1050, y: LEVEL_HEIGHT - 194, w: 192 }
]
Each platform has:
x = horizontal position

y = vertical position

w = width
The GameScene reads these values and creates the platforms.
This approach makes it easy to create additional levels later.
14. Creating the Game Scene
The main game logic lives in:
js/scenes/GameScene.jsThe GameScene is responsible for:
- Level creation
- Background
- Platforms
- Ground
- Coins
- Enemies
- Finish point
- Player
- Camera
- Game updates
- Collision-like checks
- Game completion
When the scene starts, it determines which level is active:
this.level = GAME_STATE.level || 1;Then it loads the corresponding level configuration.
15. Creating the Background
The game uses a dark night-style background.
The background contains:
- Sky
- Stars
- Mountains
- Hills
The mountains move at a different speed from the foreground.
This creates a simple parallax effect.
The far background uses:
layer.setScrollFactor(0.3);while the sky uses:
sky.setScrollFactor(0);This makes the world feel deeper as the player moves.
16. Creating the Ground
The level contains multiple ground segments.
This is important because we want gaps that the player can fall into.
For example:
██████████ ███████████ █████The player can therefore jump between sections.
The visual ground is created using generated textures, while the game keeps information about the solid areas.
17. Creating Platforms
The same principle is used for floating platforms.
Each platform gets:
- Visual representation
- Position
- Width
- Collision information
For example:
                 ─────────
                       🪙

          ────────────────

   PLAYER
     🧍
────────────────────────────
This gives the player something to jump onto.
18. Creating Coins
Coins are generated procedurally.
We don’t need another image file.
The game creates a small canvas and draws a yellow circle.
Each coin is then added to the game:
const coin = this.coins.create(p.x, p.y, 'coin');The coins also have animation.
They rotate and bob up and down using Phaser tweens.
When the player gets close enough, the game calls:
this.collectCoin(this.player, coin);The coin disappears and:
this.score += 10;The player therefore receives 10 points.
19. Creating Enemies
Our enemies are also generated programmatically.
The enemy is a simple red creature with:
- Body
- Eyes
- Health bar
This means we didn’t need an AI-generated enemy asset.
The Enemy.js class controls:
- Enemy movement
- Patrol
- Health
- Damage
- Death
- Visual effects
The enemy patrols around its starting position.
For example:
←──── Enemy ────→When it reaches one side of its patrol area, it changes direction.
20. Creating the Player Class
The player is separated into:
js/entities/Player.jsThis is a good programming practice.
The GameScene doesn’t need to contain every detail about the player.
The Player class handles:
- Movement
- Input
- Animation
- Health
- Attack
- Damage
- Death
- Jumping
- Facing direction
The class extends:
Phaser.Physics.Arcade.SpriteSo our player is a Phaser physics sprite.
21. Loading the Sprite Sheet
Once BootScene has processed the image, Player.js can use:
super(scene, x, y, 'player', 0);The 0 means the player starts with frame 0.
We then create animations.
22. Creating the Idle Animation
The idle animation uses frames 0 and 1:
anims.create({
    key: 'idle',
    frames: anims.generateFrameNumbers('player', {
        frames: [0, 1]
    }),
    frameRate: 4,
    repeat: -1
});
repeat: -1 means:
repeat forever.
So the character continuously switches between the two idle frames.
23. Creating Walk and Run
Walk:
frames: [2, 3]Run:
frames: [4, 5]The animation speed is different.
For walking:
frameRate: 8For running:
frameRate: 12This makes the run animation appear faster.
24. Jump, Attack, Hit and Death
The remaining frames are single-frame animations.
Frame 6 → Jump

Frame 7 → Attack

Frame 8 → Hit

Frame 9 → Death
For example:
anims.create({
    key: 'attack',
    frames: anims.generateFrameNumbers('player', {
        frames: [7]
    }),
    frameRate: 1,
    repeat: 0
});
Even though these are currently single-frame animations, the architecture allows us to replace them later with better multi-frame animations.
25. Making the Character Move
Now we need input.
The player reads:
A
D
Arrow Left
Arrow Right
The game determines whether the user wants to move left or right.
For example:
if (left && !right) {
    this.facing = -1;
    targetVx = -PLAYER_CONFIG.walkSpeed;
}
And for right:
if (right && !left) {
    this.facing = 1;
    targetVx = PLAYER_CONFIG.walkSpeed;
}
The velocity is then applied:
this.body.setVelocityX(targetVx);26. Flipping the Character
When the player moves left, we need the character to face left.
Phaser makes this easy:
this.setFlipX(true);When moving right:
this.setFlipX(false);Therefore, we don’t need two separate character sprite sheets.
One character can face both directions.
27. Adding Jumping
Jumping is triggered with:
Spaceor:
Arrow UpThe jump velocity is:
jumpVelocity: -520The negative value is important because Phaser’s Y-axis increases downward.
So:
Positive Y
   ↓

   🧍
   ↑
Negative Y
A negative vertical velocity moves the player upward.
28. Preventing Air Jumps
The game checks whether the player is on a solid surface before allowing a jump.
Conceptually:
if (jumpJustPressed && onGround) {
    this.body.setVelocityY(
        PLAYER_CONFIG.jumpVelocity
    );
}
This prevents unlimited jumping in mid-air.
29. Adding Attacks
The attack button triggers:
startAttack();The player enters an attacking state:
this.isAttacking = true;The attack animation plays.
A temporary invisible hitbox is created in front of the player.
The code checks whether an enemy is within that area.
If an enemy is hit:
enemy.takeDamage(
    PLAYER_CONFIG.attackDamage
);
The default attack damage is:
2530. Enemy Health
The enemy starts with:
health: 50Since each attack causes:
25 damagethe enemy needs approximately two successful attacks to be defeated.
When health reaches zero, the enemy dies.
The game then awards:
50 points31. Taking Damage
When the player touches an enemy, the player loses:
15 healthThe player starts with:
100 healthSo the health system is:
100
 ↓
85
 ↓
70
 ↓
55
 ↓
40
 ↓
25
 ↓
10
 ↓
0
The player becomes temporarily invulnerable after taking damage.
This prevents the enemy from instantly removing all health while the two objects remain close together.
32. Creating the Health Bar
The UI displays a health bar.
Initially:
████████████████████ 100As health decreases:
██████████████ 70and eventually:
███ 15The bar is redrawn based on the ratio:
hp / PLAYER_CONFIG.maxHealth33. Creating the HUD
The HUD is separated into:
js/scenes/UIScene.jsThis is important because the camera moves through the game world.
The HUD should not move with the camera.
Therefore, the UI exists as a separate scene.
It displays:
SCORE
Score: 0

HEALTH
████████████████ 100

LEVEL
Level 1
The UI Scene remains fixed to the screen while the GameScene scrolls underneath it.
34. Creating the Camera
Our level is 3000 pixels wide.
But our screen is only 960 pixels wide.
Therefore, we need a camera.
We use:
this.cameras.main.startFollow(
    this.player,
    true,
    0.1,
    0.1
);
The camera follows the player.
This produces the classic side-scrolling effect.
35. Creating Mobile Controls
Now comes one of the most important parts of this project.
We create four on-screen buttons:
[ ◀ ] [ ▶ ] [ JUMP ] [ ATK ]Each button is a Phaser interactive object.
The key event is:
pointerdownWhen the user presses the button:
btn.pressed = true;When they release it:
btn.pressed = false;The game checks these values every frame.
Therefore:
Mouse click
      ↓
pointerdown
      ↓
button.pressed = true
      ↓
Player moves
and on mobile:
Finger touch
      ↓
pointerdown
      ↓
button.pressed = true
      ↓
Player moves
The same system handles both.
36. Why Pointer Events Are Useful
Instead of writing:
Mouse system
+
Touch system
we can use Phaser pointer events.
This simplifies the code.
The buttons respond to:
bg.on('pointerdown', onDown);
bg.on('pointerup', onUp);
bg.on('pointerout', onUp);
This makes the controls usable with mouse and touch.
37. Preventing Mobile Browser Problems
Mobile browsers can interfere with games.
For example, the browser might try to:
- Scroll the page
- Zoom
- Select text
- Trigger pull-to-refresh
Our CSS therefore includes:
html, body {
    overflow: hidden;
    touch-action: none;
    user-select: none;
    overscroll-behavior: none;
}
This makes the page behave more like a game application.
38. Creating the Finish Point
At the end of the level we create a finish flag.
The player needs to reach it.
The game checks the distance between:
Player
and
Finish Zone
When the player reaches the finish:
this.reachFinish(...)is called.
The game stops normal movement and displays the completion screen.
39. Multiple Levels
The project isn’t limited to one level.
The configuration contains:
Level 1
Level 2
Level 3
Each level has its own:
- Ground
- Platforms
- Coins
- Spikes
- Enemies
The GameScene reads:
GAME_STATE.leveland selects the corresponding configuration.
This means we can expand the game simply by adding more level data.
40. Game Over
When health reaches zero:
player.die();The player stops moving.
The death animation plays.
After a short delay, the UI displays:
GAME OVER

Score: XXX

[ RESTART ]
The Restart button starts the current level again.
41. Level Complete
When the player reaches the finish:
LEVEL COMPLETE

Level 1 complete!

Score: XXX

[ NEXT LEVEL ] [ RESTART ]
If it is the final level:
FINAL LEVEL COMPLETE

Score: XXX

[ RESTART ] [ PLAY AGAIN ]
This gives the game a complete beginning-to-end gameplay loop.
42. Creating the CSS
The page-level styling is in:
css/style.cssThe CSS handles:
- Full-screen game area
- Mobile sizing
- Browser scrolling prevention
- Touch behavior
- Canvas positioning
- Background
- Text selection prevention
Phaser handles the majority of the actual game UI, while CSS handles the surrounding webpage.
43. Starting the Game
Because this is a browser game, you should run it through a local HTTP server.
Open Command Prompt.
Go to the game folder:
cd /d E:\Character-Game\gameThen run:
python -m http.server 8000You should see something similar to:
Serving HTTP on 0.0.0.0 port 8000Then open:
http://localhost:8000The browser loads:
index.htmlwhich loads Phaser and the game files.
44. Why We Use a Local Server
You might wonder why we don’t simply double-click:
index.htmlThe reason is that browsers impose restrictions on files loaded using:
file://Game assets and JavaScript modules can behave differently when loaded directly from the filesystem.
Using:
http://localhost:8000gives us a proper web environment.
It also more closely resembles how the game will work when eventually deployed online.
45. Using AI to Build the Game
This is where our development process becomes particularly interesting.
Instead of manually writing every line, we used AI coding tools.
The workflow was approximately:
Game idea
   ↓
Character generated with AI
   ↓
Sprite sheet prepared
   ↓
Project requirements written
   ↓
AI coding model
   ↓
Phaser files generated
   ↓
Run game
   ↓
Find problems
   ↓
AI debugging
   ↓
Modify files
   ↓
Test again
   ↓
Working game
This is a very practical way of using AI for software development.
46. Using Ollama
For local AI development, Ollama can run compatible AI models on your own computer.
Instead of manually copying code from an AI chat into every file, we can combine a local model with a coding agent.
This gives us a workflow closer to an AI programming assistant.
The important distinction is:
Ollama
=
runs the AI model

Coding agent
=
allows the AI to work with project files
This distinction is important for beginners.
47. Using OpenCode
We used OpenCode as the coding-agent layer.
Instead of asking:
Give me the contents of GameScene.js.
and then manually copying the response into the file, the coding agent can work directly with the project.
The workflow becomes:
You
 ↓
OpenCode
 ↓
AI model
 ↓
Inspect project files
 ↓
Create / modify files
 ↓
Run checks
 ↓
Fix errors
This is much more convenient for multi-file projects.
48. Giving the AI a Proper Specification
One of the biggest lessons from this project is:
Don’t simply tell the AI: “Make me a game.”
Give it a proper specification.
For example:
Create a Phaser 3 platform game.

The player must:

- move left
- move right
- jump
- attack
- collect coins
- fight enemies
- have health
- die
- reach the finish

Controls:

A / D
Arrow keys
Space
J

Mobile:

Left
Right
Jump
Attack

Create multiple levels.

Use Arcade Physics.

Use a responsive canvas.

Create Game Over and Level Complete screens.
The more precisely you define the requirements, the more useful the generated project becomes.
49. The First Version May Not Work Perfectly
This is another important lesson.
AI-generated code does not mean:
Generate once → perfect game.
Our project went through debugging.
For example, the first version had problems involving:
- Player movement
- Sprite-sheet processing
- Physics
- Input
- Collision behavior
- Asset handling
The browser could load the game while the character still didn’t behave correctly.
This is completely normal in AI-assisted development.
50. Debugging with AI
Instead of starting again, we gave the coding agent the actual problem.
For example:
The game loads, but the player isn’t moving.
Then the AI could inspect the existing files and determine where the problem was.
We also added diagnostic logging.
For example:
console.log('[INPUT] DOM left pressed');and:
console.log(
    '[PLAYER] vx=' +
    Math.round(this.body.velocity.x)
);
This lets us determine whether:
Keyboard input
        ↓
Player input state
        ↓
Velocity
        ↓
Character movement
is actually working.
51. An Important Debugging Principle
When a game doesn’t work, don’t immediately rewrite everything.
Break the problem into stages.
For movement:
Is keyboard input detected?
        ↓
Yes / No

Is button input detected?
        ↓
Yes / No

Is player.update() running?
        ↓
Yes / No

Is velocity changing?
        ↓
Yes / No

Is the player actually moving?
        ↓
Yes / No
This makes debugging much easier.
52. Why Our Final Game Uses Some Manual Checks
The project initially attempted to rely more heavily on Phaser’s collision system.
However, during development we encountered issues with the particular Phaser environment/build being used.
Instead of allowing the project to remain broken, the implementation was adjusted.
Some interactions are therefore checked manually.
For example:
Player ↔ Coin
Player ↔ Enemy
Player ↔ Spike
Player ↔ Finish
Player ↔ Ground
The game calculates distances and positions to determine whether an interaction has occurred.
This is not necessarily how a large commercial platformer should ultimately be architected, but it is perfectly useful for a small prototype and makes the current project easier to understand.
53. Testing the Finished Game
Once the files are generated, we test:
Desktop
A
D
←
→
Space
J
Mouse
◀
▶
JUMP
ATK
Mobile
Touch:
◀
▶
JUMP
ATK
Then test:
Movement
↓
Jumping
↓
Coins
↓
Enemy
↓
Attack
↓
Damage
↓
Death
↓
Restart
↓
Finish
↓
Next level
This is essentially a complete gameplay test.
54. What We Have Built
At this point, we have a complete small 2D platformer adventure game.
The architecture is:
                    Phaser Game
                         │
            ┌────────────┴────────────┐
            │                         │
        GameScene                  UIScene
            │                         │
     ┌──────┼─────────┐        ┌──────┼──────┐
     │      │         │        │      │      │
   Player  Enemy     Coins    Score Health Level
     │
     ├── Movement
     ├── Jump
     ├── Attack
     ├── Damage
     └── Death
And the game world contains:
Background
     ↓
Terrain
     ↓
Platforms
     ↓
Coins
     ↓
Enemies
     ↓
Player
     ↓
Finish
55. What Could We Add Next?
The current project is intentionally small.
But this architecture can be expanded considerably.
For example, we could add:
Better character animations
Instead of two walking frames:
Walk 1
Walk 2
we could create:
Walk 1
Walk 2
Walk 3
Walk 4
Walk 5
Walk 6
Walk 7
Walk 8
This would make movement much smoother.
More enemies
We could create:
- Flying enemies
- Shooting enemies
- Bosses
- Fast enemies
- Patrol enemies
More weapons
For example:
Punch
Sword
Gun
Magic
Projectile
Power-ups
Such as:
Health
Shield
Speed
Double Jump
Attack Boost
More levels
The existing level-data approach makes this relatively straightforward.
56. Could This Become a Real Mobile Game?
Yes.
The current project is a browser game, but Phaser games can also be packaged for mobile applications using appropriate wrappers/tooling.
That means the same core JavaScript game can potentially become an Android/iOS application.
However, before packaging it, I would first improve:
- Character animations
- Collision system
- Game menus
- Sound
- Music
- Asset quality
- Mobile UI
- Performance
- Save/progression system
Then package and publish it.
57. Final Project Workflow
The complete workflow we followed can be summarized as:
STEP 1
Decide the game concept
        ↓
STEP 2
Create the character with AI
        ↓
STEP 3
Create multiple character poses
        ↓
STEP 4
Prepare the sprite sheet
        ↓
STEP 5
Create Phaser project
        ↓
STEP 6
Configure Phaser and Arcade Physics
        ↓
STEP 7
Create BootScene
        ↓
STEP 8
Process the character sprite sheet
        ↓
STEP 9
Create Player class
        ↓
STEP 10
Create player animations
        ↓
STEP 11
Add keyboard controls
        ↓
STEP 12
Add mouse/touch controls
        ↓
STEP 13
Create GameScene
        ↓
STEP 14
Create background
        ↓
STEP 15
Create ground and platforms
        ↓
STEP 16
Create coins
        ↓
STEP 17
Create enemies
        ↓
STEP 18
Add player attack
        ↓
STEP 19
Add health and damage
        ↓
STEP 20
Create HUD
        ↓
STEP 21
Add camera scrolling
        ↓
STEP 22
Add finish point
        ↓
STEP 23
Add Game Over
        ↓
STEP 24
Add Level Complete
        ↓
STEP 25
Add multiple levels
        ↓
STEP 26
Run locally
        ↓
STEP 27
Test
        ↓
STEP 28
Use AI to debug problems
        ↓
STEP 29
Retest
        ↓
STEP 30
Final playable game
Conclusion
Creating a small game with Phaser is much more approachable than it might initially appear, especially when you combine it with AI-assisted development.
The most important lesson isn’t that AI can generate a game in one click. It can’t reliably do that for every project.
The more useful workflow is:
human defines the game → AI generates the initial implementation → you run it → identify real problems → AI inspects and fixes the project → you test again.
In our case, the character itself was created using AI, the game structure and JavaScript were developed with AI assistance, and Ollama and OpenCode helped us work directly with the project files and debug the implementation.
The final result is a small but genuine 2D platformer/adventure game with a custom character, animations, physics, enemies, coins, health, combat, multiple levels, responsive controls, mouse support and mobile touch controls—all running in a browser.
And that’s the interesting part: you don’t need to start by becoming a professional game developer. You can start with a simple game idea, learn the fundamentals of Phaser and JavaScript, and use AI as a development assistant while you build and debug the project step by step.