
PostgreSQL is one of the most popular open source relational database management systems available today. It is widely used for web applications, data analytics, backend development, software projects, and enterprise applications. However, if you are learning PostgreSQL, you may not always want to install and maintain a database server on your own computer.
A cloud hosted PostgreSQL database provides a much easier alternative. Instead of installing PostgreSQL Server locally, you can create a database that runs on cloud infrastructure and connect to it from tools such as pgAdmin, applications, Python, PHP, Node.js, or other PostgreSQL-compatible software.
In this tutorial, I am going to show you how to get a free cloud hosted PostgreSQL database using Aiven. Aiven provides managed PostgreSQL services, which means the underlying infrastructure and database service are managed through its cloud platform.
At the time of writing, Aiven offers a Free PostgreSQL tier with 1 CPU, 1 GB RAM, and 1 GB storage on a single node. The free service does not require a credit card and has no fixed expiry period, although free services can be powered off after periods of inactivity.
This makes it particularly useful for students, developers, trainers, SQL learners, testers, and people building small prototypes.
What Is a Cloud Hosted PostgreSQL Database?
Before creating the database, it is important to understand what we mean by a cloud hosted PostgreSQL database.
When PostgreSQL is installed directly on your computer, your machine acts as the database server. You install PostgreSQL Server, configure it, start the PostgreSQL service, and connect to it using a client such as pgAdmin.
With a cloud hosted database, the PostgreSQL server runs on infrastructure provided by a cloud service. You do not have to install or maintain the database server on your own computer.
Instead, the provider gives you connection information such as:
- Host name
- Port
- Database name
- Username
- Password
- SSL or connection configuration
You can then use those details to connect your local tools or applications to the remote PostgreSQL database.
This is especially useful when you want to learn PostgreSQL without spending time configuring a local server.
Why I Used Aiven
For this tutorial, I used Aiven because it provides a simple interface for creating managed database services.
The Aiven platform supports several services, including PostgreSQL, MySQL, Apache Kafka, OpenSearch, ClickHouse, Valkey, and Grafana.
For PostgreSQL learners, the important option is PostgreSQL.
Aiven’s current free PostgreSQL offering provides a real managed PostgreSQL instance rather than simply giving you a temporary SQL playground. The free plan includes a single node, 1 CPU, 1 GB RAM, 1 GB disk storage, monitoring, backups, and support for PostgreSQL extensions.
It is therefore suitable for learning SQL, testing database designs, experimenting with applications, and creating small projects.
Step 1: Create an Aiven Account
The first step is to create an account on Aiven.
Open the Aiven website and create an account. According to Aiven’s current information, the free PostgreSQL service does not require a credit card or payment details.
After signing in, you will reach the Aiven console.
The console provides a project-based environment where you can create and manage different cloud services.
For this tutorial, create or select the project where you want to keep your PostgreSQL service.
Once you are inside the project, look for the Services section.
Step 2: Create a New PostgreSQL Service
From the Aiven project dashboard, open Services.
You should see an option such as Create service or Create new service.
Aiven provides several services that you can create. Select PostgreSQL.
Aiven’s documentation follows the same general process: open the Services section, click Create service, select PostgreSQL, choose the service tier, and then configure the service.
Screenshot Placeholder 1
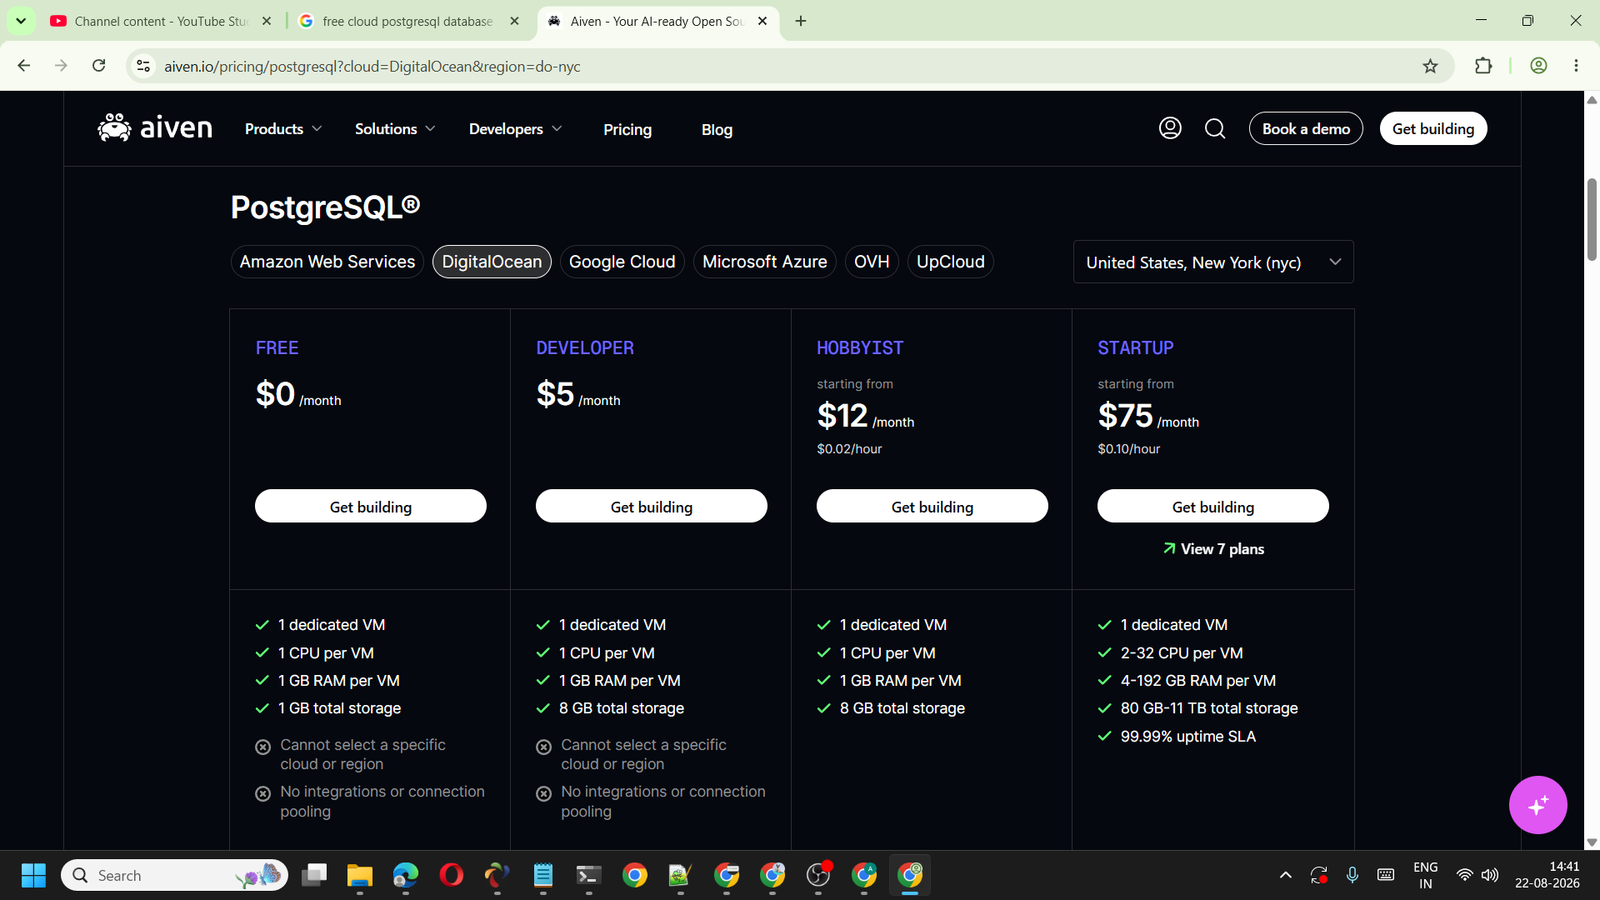
This is the screen where you select PostgreSQL from the available database and infrastructure services.
Step 3: Select the Free Service Tier
After selecting PostgreSQL, Aiven will ask you to choose a service tier.
You will see different options depending on the current Aiven configuration and available plans.
For this tutorial, select Free.
The Free tier is designed for learning, experimentation, prototypes, and small workloads. Aiven currently lists the free PostgreSQL configuration as:
- 1 dedicated virtual machine
- 1 CPU
- 1 GB RAM
- 1 GB total storage
- Single-node PostgreSQL service
- Monitoring for metrics and logs
- Backups
- PostgreSQL extension support
The free tier also has limitations. For example, it does not provide high availability, connection pooling, integrations, or a static IP, and the PostgreSQL max_connections default is 20.
Screenshot Placeholder 2
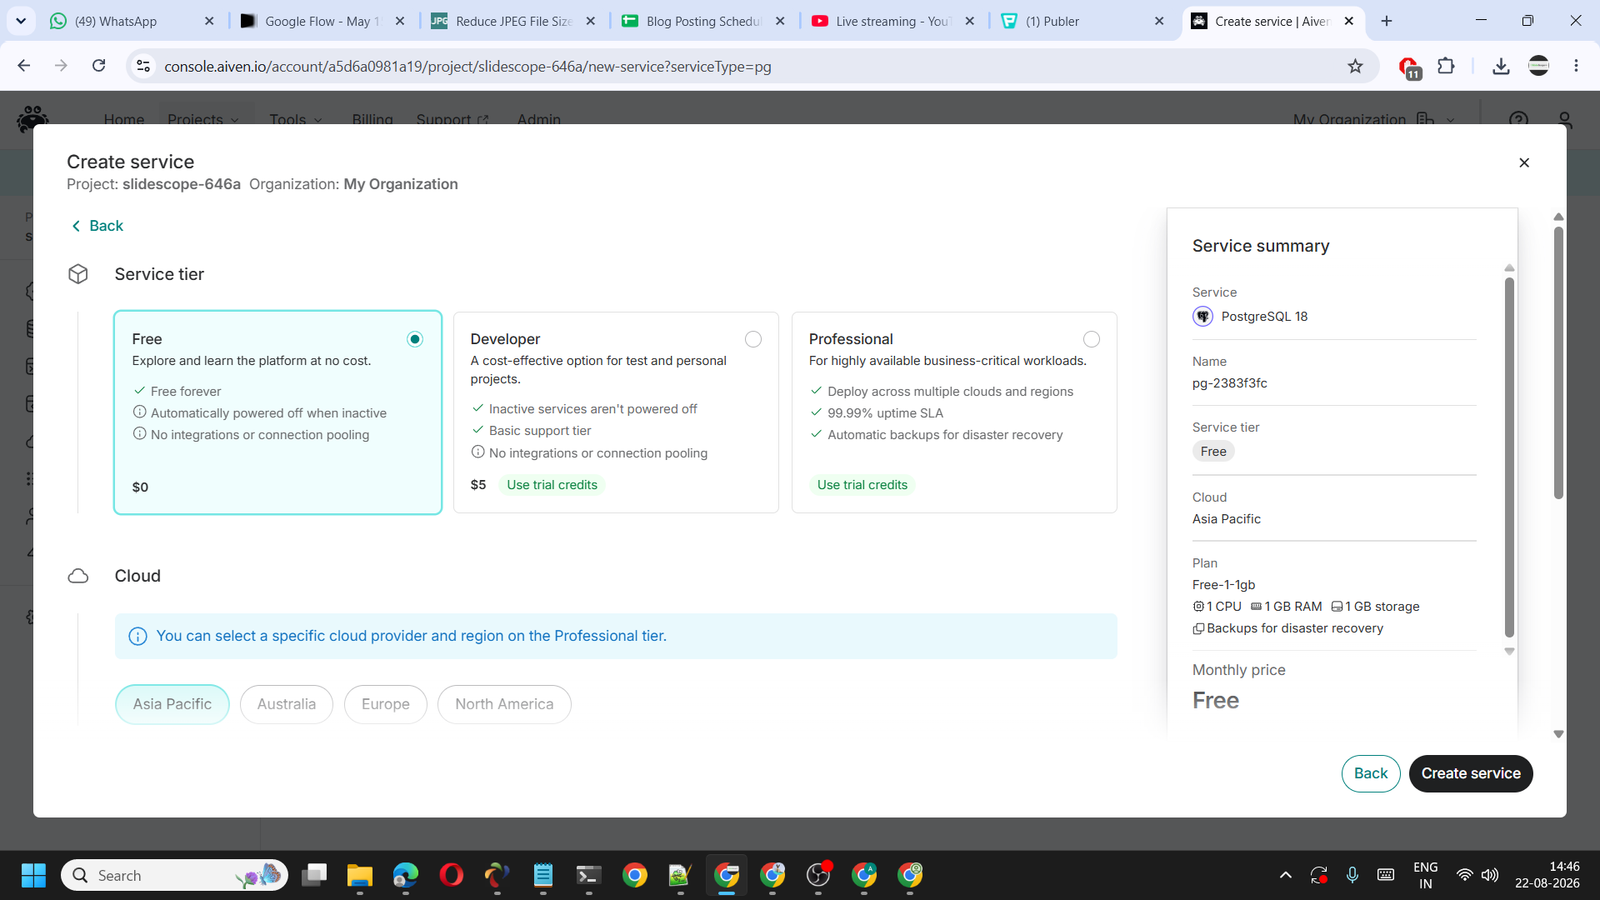
As shown in the tutorial screenshot, the Free option is displayed with a price of $0.
For learning PostgreSQL, you can select this option and continue.
Step 4: Select the Cloud and Region
The next section is related to the cloud location.
Aiven’s interface can display different cloud and region options depending on the service tier.
One important point is that the Free PostgreSQL tier does not allow you to select a specific cloud provider or specific region. Aiven determines the infrastructure location for the free service.
This is different from some paid tiers where you may have more control over cloud and region selection.
For a learning database, this limitation is generally not a problem.
You can simply continue with the available free configuration.
Step 5: Review the Service Summary
Before creating the database, Aiven displays a service summary.
This section allows you to verify the service type, service name, plan, cloud information, CPU, RAM, and storage.
In my example, the service is PostgreSQL 18 and the selected plan is the Free plan.
Screenshot Placeholder 3
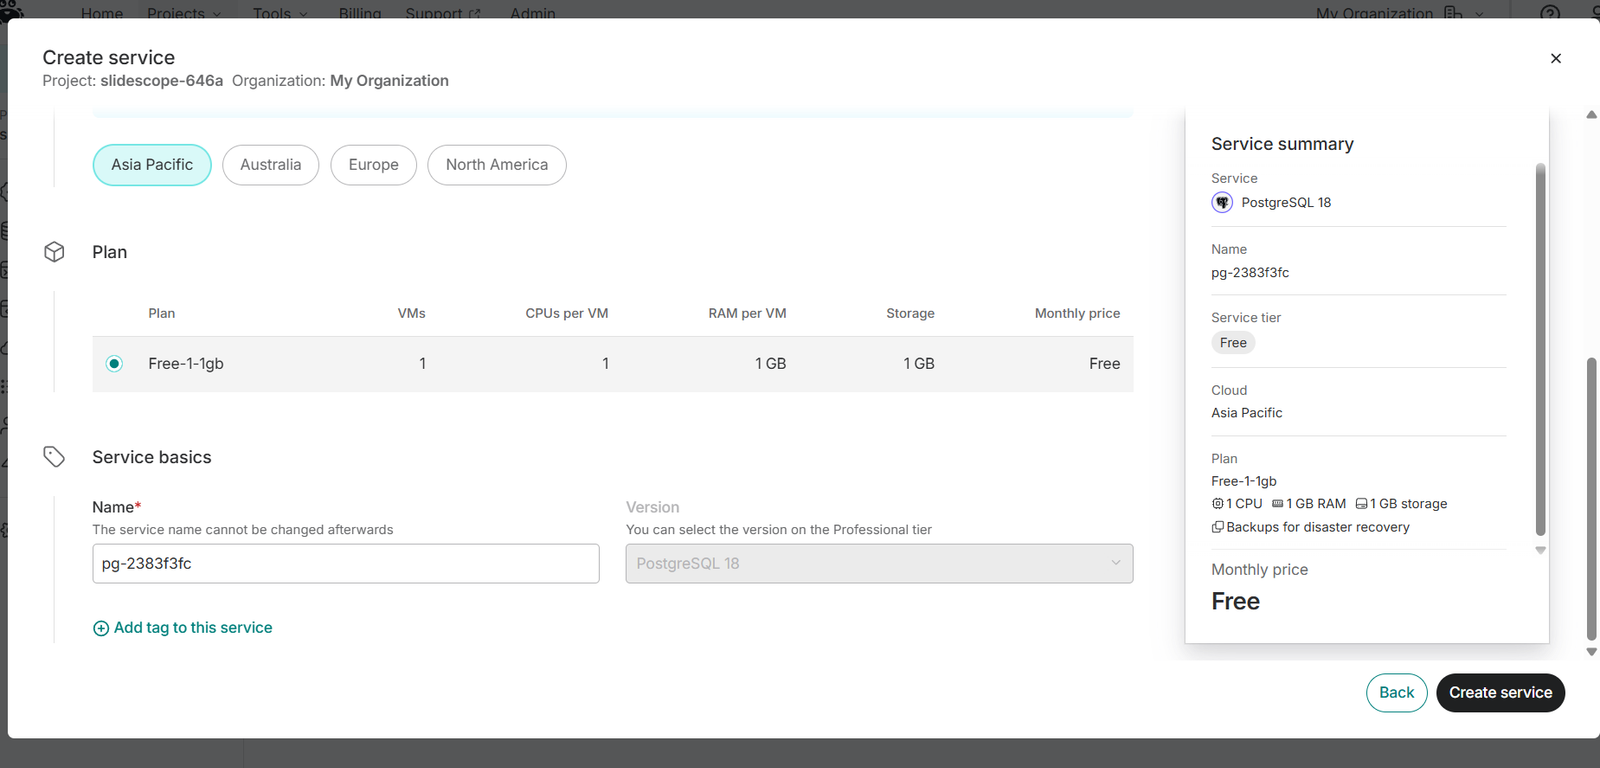
Check that the service tier shows Free and that the monthly price is Free before continuing.
Once everything looks correct, click Create service.
Step 6: Wait for PostgreSQL to Start
After clicking Create service, Aiven starts building the PostgreSQL service.
The service may initially show a status indicating that it is being created or rebuilt.
According to Aiven’s documentation, the service becomes available when its status changes to Running. The initial creation normally takes a couple of minutes, although the exact time can vary.
Once the service is running, you have your cloud hosted PostgreSQL environment.
You do not need to install PostgreSQL Server on your Windows computer just to use this cloud database.
Step 7: Get Your PostgreSQL Connection Details
After the service is running, open the PostgreSQL service in Aiven.
You should find a connection section containing the information required to connect to the database.
Typically, you will need details such as:
Host: Your Aiven PostgreSQL hostname
Port: PostgreSQL port
Database: Database name
User: Database username
Password: Database password
SSL: Connection security information
Keep these credentials private.
Do not publish your database password in a tutorial screenshot, GitHub repository, public website, or source code.
If you are connecting through an application, use environment variables or another secure configuration method rather than writing the password directly into your code.
Step 8: Connect the Cloud Database with pgAdmin
One of the easiest ways to work with your new cloud PostgreSQL database is through pgAdmin.
pgAdmin is a graphical administration and development tool for PostgreSQL.
Importantly, pgAdmin itself is not the PostgreSQL server. It is the client tool that allows you to manage and query PostgreSQL databases.
This distinction is useful if you previously installed pgAdmin on Windows and wondered whether PostgreSQL Server was also installed.
With an Aiven hosted database, you can install pgAdmin locally and use it to connect to the PostgreSQL server running in Aiven’s cloud.
Open pgAdmin and select Register > Server.
Under the Connection section, enter the host, port, maintenance database, username, and password provided by Aiven.
For example:
Host name/address: Your Aiven host
Port: Your Aiven PostgreSQL port
Maintenance database: postgres
Username: Your Aiven username
Password: Your Aiven password
Do not simply enter localhost when connecting to the Aiven database. localhost refers to your own computer. You need to use the hostname provided by Aiven.
After entering the connection details, save the server.
If the credentials and network configuration are correct, pgAdmin should connect to your cloud hosted PostgreSQL service.
What Can You Do With the Free Database?
Once your database is connected, you can use it just like a PostgreSQL database for many learning and development tasks.
For example, you can create tables:
CREATE TABLE students (
    student_id SERIAL PRIMARY KEY,
    student_name VARCHAR(100),
    course VARCHAR(100),
    fees NUMERIC(10,2)
);
You can insert data:
INSERT INTO students
(student_name, course, fees)
VALUES
('Rahul', 'Data Analytics', 25000),
('Priya', 'Digital Marketing', 18000);
Then you can run queries:
SELECT *
FROM students;
This gives you a real PostgreSQL environment where you can practice SELECT, INSERT, UPDATE, DELETE, joins, subqueries, CTEs, window functions, views, indexes, and other PostgreSQL features.
You can also connect the database to programming languages and frameworks that support PostgreSQL.
Is Aiven’s Free PostgreSQL Database Really Free?
Yes. Aiven currently describes its Free PostgreSQL tier as free indefinitely rather than as a short trial. It does not require a credit card, and there is no fixed expiration date for the free service.
However, free does not mean unlimited.
The biggest limitations are the available resources and the intended use case.
The service provides only 1 GB of storage and 1 GB of RAM. It is also a single-node service without the high-availability features expected from larger production deployments.
Aiven may also power off free services after periods of inactivity. The service can be powered back on, but this is an important consideration if you expect a database to remain continuously available.
Who Should Use This Free PostgreSQL Database?
I would recommend this type of cloud database primarily for:
- Students learning SQL
- PostgreSQL beginners
- IT trainers
- Developers testing applications
- Data analysts practicing SQL
- Small proof-of-concept projects
- Database experiments
- Testing PostgreSQL extensions
- Portfolio projects
- Learning cloud databases
For example, if you are learning SQL and want to practice advanced queries without installing a local PostgreSQL server, this can be a convenient solution.
Similarly, a developer building a small application can use the free service while experimenting with the database structure.
Is It Suitable for Production?
The free Aiven PostgreSQL tier should not be treated as a replacement for a properly configured production database.
The free plan is designed around small-scale workloads, learning, experimentation, and prototypes. Aiven itself does not recommend the free plan for high-traffic production workloads.
If your application becomes important and needs more storage, resources, availability, connections, or support, you can consider moving to a paid plan.
Aiven currently provides a Developer tier for PostgreSQL starting at $5 per month, with additional storage and features compared with the Free tier.
Final Thoughts
Getting a cloud hosted PostgreSQL database does not have to be complicated.
With Aiven, you can create a managed PostgreSQL service through a web interface, select the Free tier, wait for the service to start, and then connect to it using tools such as pgAdmin.
For anyone learning PostgreSQL, this is particularly useful because you can separate your database server from your local computer. Your Windows machine only needs the software required to connect to the database; the actual PostgreSQL service runs in the cloud.
The Free tier provides enough resources for SQL practice, small experiments, database demonstrations, and many learning projects. Just remember that it has limitations, including 1 GB storage, 1 GB RAM, a single node, limited connections, and inactivity-based power-off behavior.
If you are beginning your PostgreSQL journey, I recommend starting with simple tables and SQL queries, then gradually moving toward joins, subqueries, CTEs, window functions, indexes, views, and application connectivity.
The important thing is that you now have a real cloud PostgreSQL environment that you can access from your computer without having to run the PostgreSQL server locally.
Disclaimer: This tutorial is intended for educational and informational purposes. Aiven’s plans, pricing, resource limits, supported regions, interface, and service policies can change over time. Always check the current Aiven documentation and pricing before relying on a free or paid service for an important application. Do not store sensitive or production-critical information in a free learning database without appropriate security, backup, availability, and compliance considerations.